How to Create an NDIS Invoice? A Step by Step Guide
Learn how to create an NDIS invoice manually, the common challenges providers face, and how invoicing software helps you stay compliant and get paid faster.

Creating an NDIS invoice is one of the most important tasks for providers, self-managed participants, and community care services. Without proper invoices, payments are delayed, compliance risks rise, and your time is swallowed up in admin work.
Why NDIS Invoicing Matters
NDIS invoicing isn’t just a box-ticking exercise it’s the backbone of running a sustainable care business. A correct invoice ensures:
- Timely payments: Timely payments are only possible when invoices are accurate, because even small errors can cause weeks of delays.
- Compliance: Compliance is essential, as every invoice must match current NDIS Pricing Guide standards to be accepted.
- Audit readiness: Audit readiness is achieved when providers keep clean and accurate records that can be easily reviewed if required.
- Client trust: Client trust grows when invoices are professional and accurate, showing that your business is reliable and organized.
For providers who want to avoid the stress of rejections and resubmissions, it’s worth learning about the most common NDIS invoicing mistakes so you can stay compliant and save time.
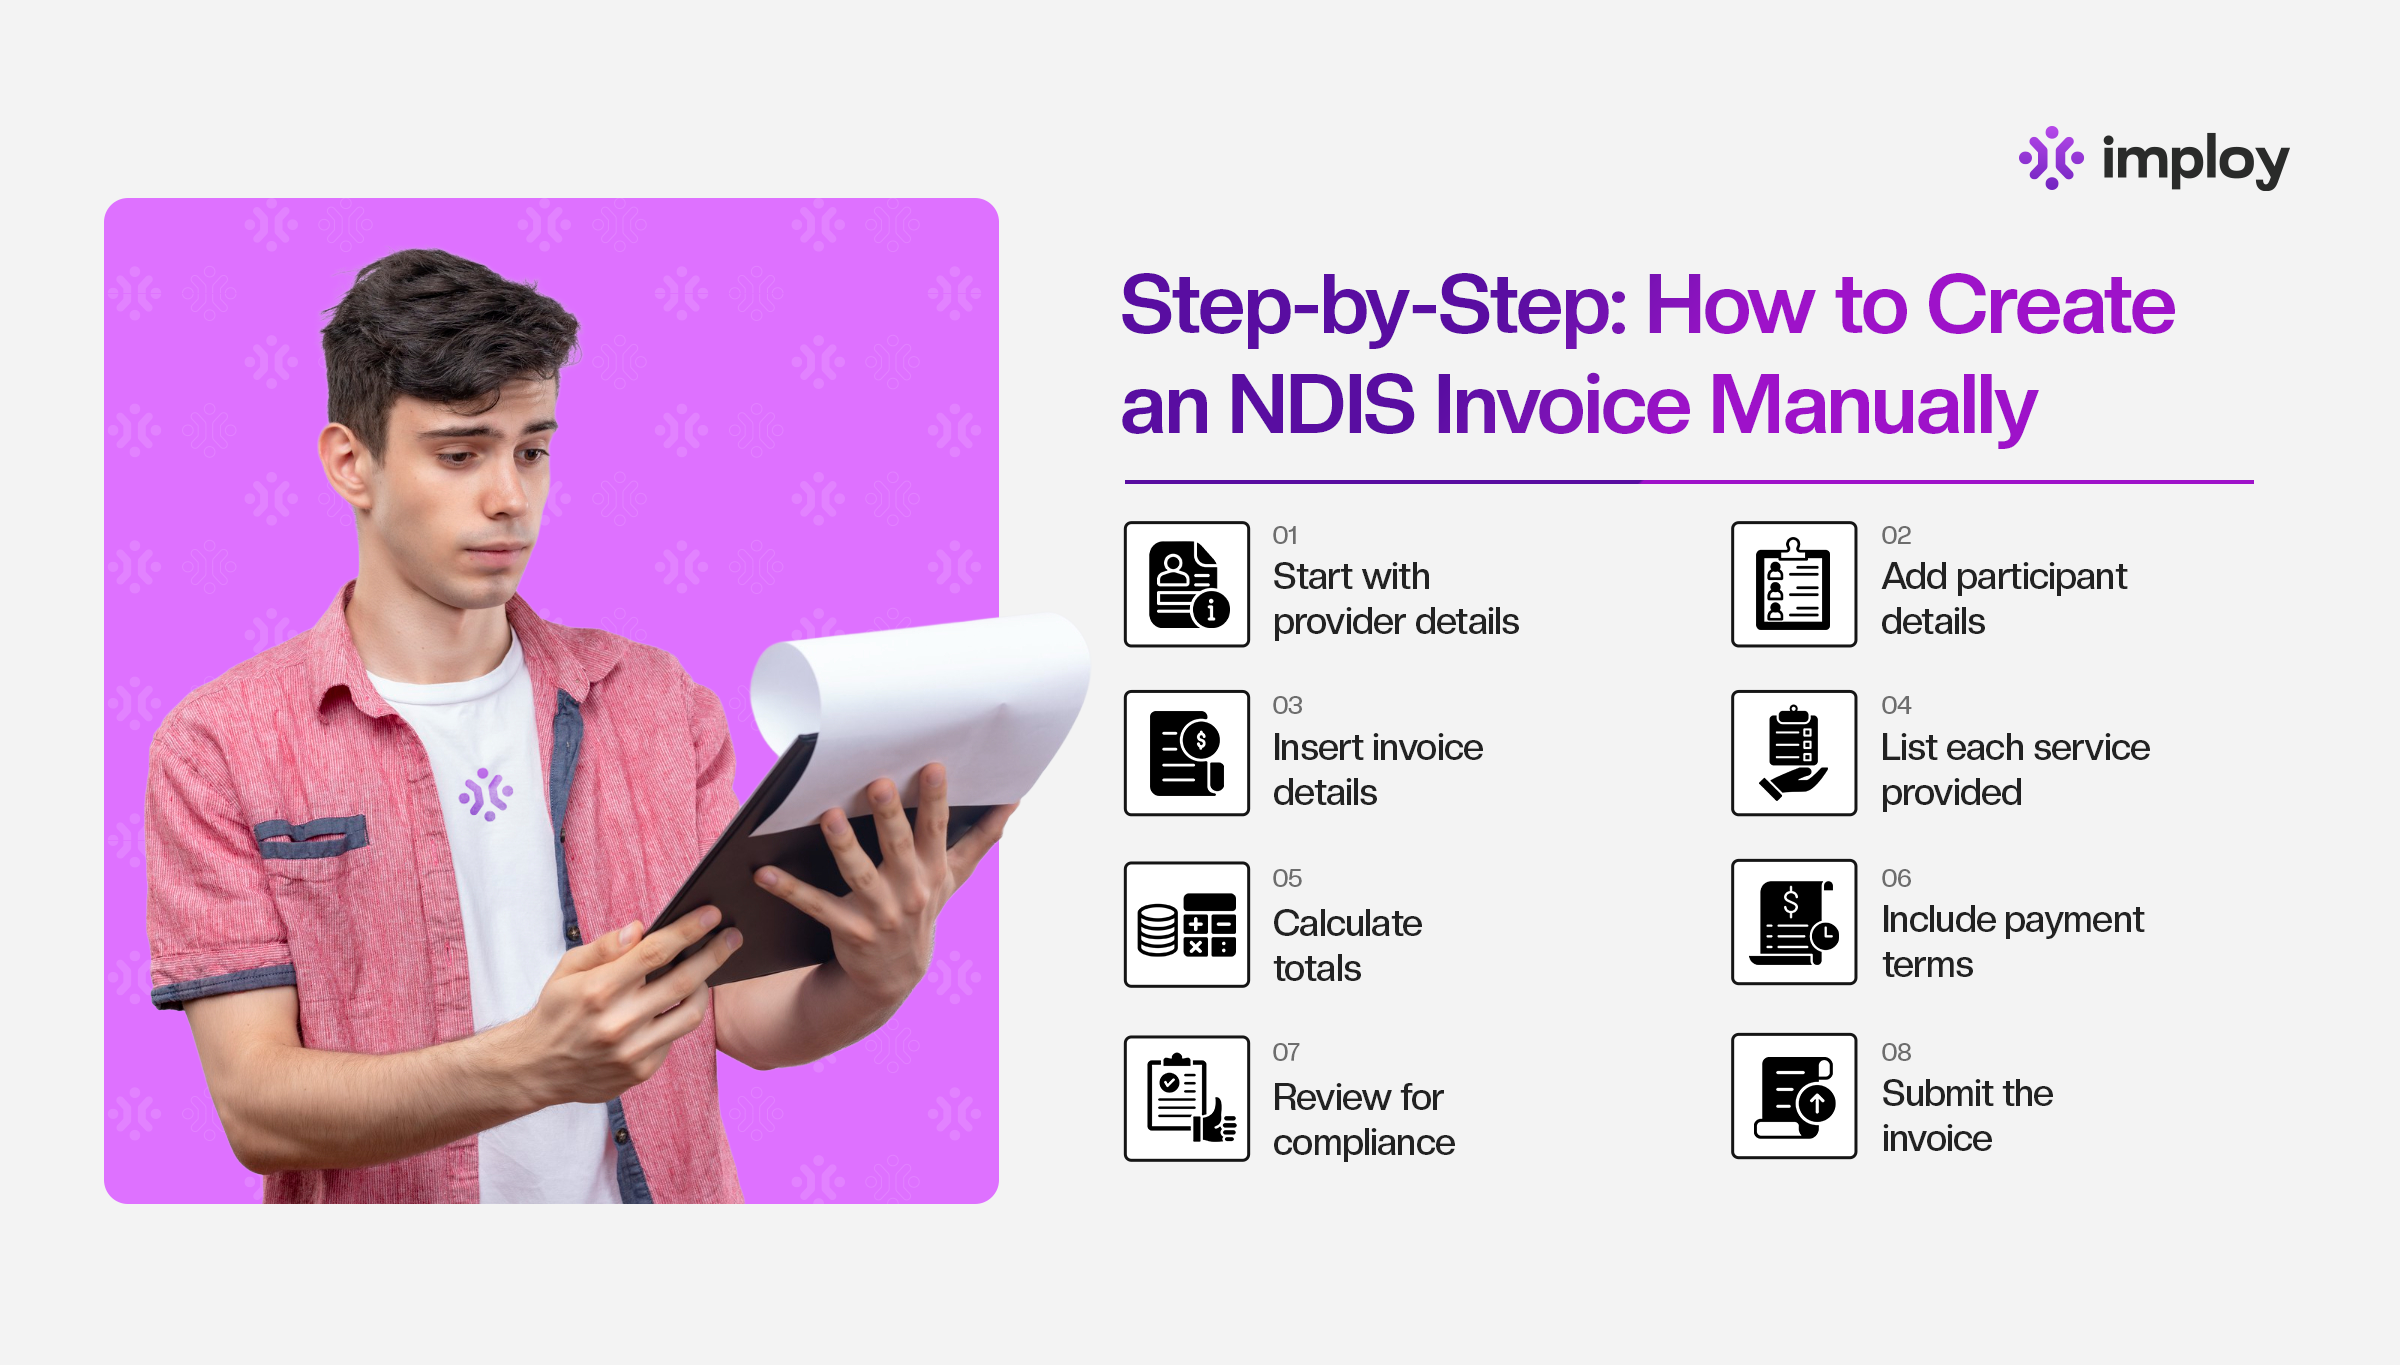
Step-by-Step: How to Create an NDIS Invoice Manually
If you were to actually make an NDIS invoice by hand, here’s everything you would need to prepare and include:
- Start with provider details
- Write your business name exactly as it appears on your ABN registration.
- Add your ABN (Australian Business Number), address, phone number, and email address.
- Include your bank details (BSB and account number) so the participant or plan manager can make a payment.
- Write your business name exactly as it appears on your ABN registration.
- Add participant details
- Record the participant’s full name.
- Include their NDIS number to link the invoice directly to their plan.
- Add their contact information if required (address or email).
- Record the participant’s full name.
- Insert invoice details
- Assign a unique invoice number (e.g., INV-001, INV-002).
- Include the invoice date (the day you issue it).
- Add the service delivery period (e.g., 01/08/2025 – 15/08/2025).
- Assign a unique invoice number (e.g., INV-001, INV-002).
- List each service provided
- Write the service date(s) and times.
- Add the support item code from the current NDIS Pricing Guide.
- Provide a clear description of the service delivered (e.g., “Assistance with daily personal activities”).
- Record the number of hours, sessions, or units provided.
- Enter the rate (per hour/session) exactly as per the NDIS Pricing Guide.
- Calculate the total cost for each line item.
- Write the service date(s) and times.
(Example: 3 hours @ $62.17 per hour = $186.51)
- Calculate totals
- Add all service line totals together to create a subtotal.
- Apply GST only if applicable (most NDIS supports are GST-free).
- Show the final total amount due.
- Add all service line totals together to create a subtotal.
- Include payment terms
- State how long the participant or plan manager has to pay (e.g., “Payment due within 14 days”).
- Provide accepted payment methods (bank transfer, etc.).
- State how long the participant or plan manager has to pay (e.g., “Payment due within 14 days”).
- Review for compliance
- Double-check that every code matches the latest NDIS Pricing Guide.
- Make sure the math is correct down to the cent.
- Confirm that your invoice format is professional and includes all required details.
- Double-check that every code matches the latest NDIS Pricing Guide.
- Submit the invoice
- Send it directly to the participant (if self-managed), their plan manager, or through the NDIS portal if applicable.
- Keep a copy for your records in case of audits.
- Send it directly to the participant (if self-managed), their plan manager, or through the NDIS portal if applicable.
Common Challenges with Manual NDIS Invoicing
Even the most careful provider can run into roadblocks:
- Human errors: Human errors are common because even small typos or incorrect line items can cause invoices to be rejected.
- Time-consuming admin: Manual invoicing is time-consuming since hours spent compiling data are hours lost that could have been dedicated to clients.
- Constant updates: The NDIS Pricing Guide changes regularly, and keeping up with these constant updates can be tough for providers.
- Delayed payments: Delayed payments often happen because mistakes cause invoices to bounce back, which slows down cash flow and increases stress.
Manual invoicing may save you on software costs upfront, but the hidden cost is lost time, delayed payments, and compliance headaches. This is why many providers explore dedicated invoicing tools for NDIS providers, which are built to remove these common issues.
Why Using an Invoicing Tool Simplifies Everything
Here’s where technology changes the game. A dedicated NDIS invoicing tool solves the biggest pain points:
- Error reduction: Error reduction is achieved because invoices can be auto-generated directly from service records rather than being typed manually.
- Always compliant: Providers remain always compliant since pricing and codes are automatically updated whenever the NDIS makes changes.
- Time savings: Time savings are significant because bulk invoices can be processed in minutes instead of hours.
- Financial integration: Financial integration is made easy as invoicing tools can sync directly with accounting systems to keep records clean and accurate.
- Audit-proof: Audit-proofing is built in because all invoices are securely stored, fully searchable, and easily exportable for compliance checks.
Instead of worrying whether you entered the right code, software ensures accuracy from the start.
How Imploy’s Invoicing feature Makes It Seamless
At Imploy, we know NDIS invoicing is more than just paperwork, it’s about freeing up your time so you can focus on what matters most: care.
So invoicing is a built in feature accessible to all the imploy users.
With Imploy, you can:
- Input service details once and auto-generate professional NDIS invoices
- Ensure every invoice matches the latest NDIS Pricing Guide
- Bulk-send invoices in minutes, not hours
- Track and store records securely for audits or funding reviews
Many providers also use invoicing tools alongside smart budgeting strategies for NDIS providers to keep their finances sustainable while reducing admin burdens.
Real-World Benefits
Providers using invoicing tools like Imploy report:
- Up to 70% faster invoice processing
- Fewer rejected invoices due to accuracy
- Peace of mind knowing compliance is built in
- More time to focus on delivering services, not chasing admin
Conclusion
Yes, you can create an NDIS invoice manually. But ask yourself: how much time do you want to lose double-checking codes, worrying about compliance updates, and fixing rejected claims?
The smarter path is simple: use an invoicing tool designed for NDIS providers.
With Imploy, invoicing is no longer a burden, it’s a streamlined, automated, and compliant process that helps you stay ahead, reduce stress, and grow your business.
FAQs
Q1: What must be included in an NDIS invoice?
An NDIS invoice must include provider details (ABN, name, contact), participant details (name, NDIS number), service codes, descriptions, dates, rates, and total amounts.
Q2: How often should I invoice under the NDIS?
Most providers invoice weekly or fortnightly to maintain healthy cash flow, but it depends on your service agreements.
Q3: Can self-managed participants create their own invoices?
Yes, but it can be time-consuming. Using a tool like Imploy makes it much easier and ensures compliance.
Q4: What happens if my invoice is rejected?
You’ll need to correct and resubmit it, which delays payment. Software reduces the risk of rejection by ensuring accuracy.
Q5: Do I need special accounting software for NDIS invoices?
Not necessarily. An NDIS-specific invoicing tool like Imploy is designed to handle compliance automatically and can integrate with accounting systems if needed.